Here we are, finally we have the Dependency Inversion on Swift through Protocol talk. On our last blog post of Introduction of Dependency Inversion on Swift we were introduced with the two type of dependencies, run time dependency and source code or compile time dependency. On this blog post we will talk about how to achieve Dependency Inversion on Swift by using protocol. So that we can alter the dependency direction between compile and run time. We will also talk about on when to smell for dependency inversion and what are the best doings for inverting the dependencies.
The Swift Protocol Hub contains all the related posts with protocol. Be sure to check that out.
Background
- What is Dependency Inversion
- Why we need the Dependency Inversion
- Generic process for achieving Dependency Inversion through protocol
- Explanation of DIP on
UITableViewDataSource - A case study on Dependency Inversion principle
- How and where to smell for implementing DIP On Swift
- Best practices on Swift for DIP through protocol
- Resources
Dependency Inversion
As we said on our last blog post that, the process of reversing the run time dependency with respect to the compile time dependency is called the Dependency Inversion.
Say we have two different module, A and B. A is dependent on f() which is defined in B. So for A, A is dependent on B both on run and compile time.
Now consider, if we introduce a protocol p which will hold the declaration of f(). And B implements that protocol thus defining the f(). On this time if A uses the p.f(), then the dependency is inverted and Dependency inversion is achieve. Because on compile time A is dependent on P, which is reverse of the run time dependency to B.
In case of a confusion we can alway visit our last blog post and review the explanation of run and compile time decencies.
Why we need the Dependency Inversion
The basic question has not been answered yet. Why do we need dependency Inversion?
The reason is to achieve loosely coupled code base. And we understand that, the loosely coupled code is far more flexible to requirement changes.
That leads to another question. How Dependency Inversion makes the flexible code?
By implementing dependency inversion principle we create an abstraction between two interacting module. Both of those two interacting module depends on the abstraction. In Swift we achieve the abstraction through protocol.
Now the individual module can evolved separately based on the requirement changes without affecting the counterpart module. The reason is both module only knows the protocol not the other part. So one module is unaware of the adding, updating or even removing of other module. Thats how Dependency inversion makes the code more flexible with requirement change.
Generic process for achieving Dependency Inversion through protocol
Ok so now we know dependency inversion is a necessity for agile code. We already have a clue on how to achieve that dependency inversion through abstraction. More specifically on Swift, protocol is the key for dependency inversion.
On general we hide the implementation details through abstraction to gain loosely coupled code. There is a common term used regularly to describe the dependency inversion principle:
High level policies should not depend on low level details. They both should depend on abstraction.
-Generic term
We need an explanation for the above statement. Usually high level policies means the logic part of a module and the low level details means the implementation part of that module. Now an example will clarify the issue.
We will pick one from the UIKit itself. Perhaps we use this specific dependency inversion most often without knowing its existence. Well, it is none other than the UITableViewDataSource. Amazing right? On reality every delegation is a case of DIP. We use the Dependency Inversion principle on Swift whenever we are initiating and implementing the protocol, may be without understanding. That blur part is the target of this blog post. We want to focus on the usage the Dependency Inversion Principle on Swift through protocol on a concern mind on this blog post. Hopefully after this blog post we will be able to use the protocol effectively to achieving Dependency Inversion Principle to the proper way.
Explanation of DIP on UITableViewDataSource
Now let us concentrate our discussion on the hows and whys of UITableViewDataSource. So what happens by conforming the UITableViewDataSource delegate. We have to implement two methods tableView(_ tableView: UITableView, numberOfRowsInSection section: Int) -> InttableView(_ tableView: UITableView, cellForRowAt indexPath: IndexPath) -> UITableViewCell
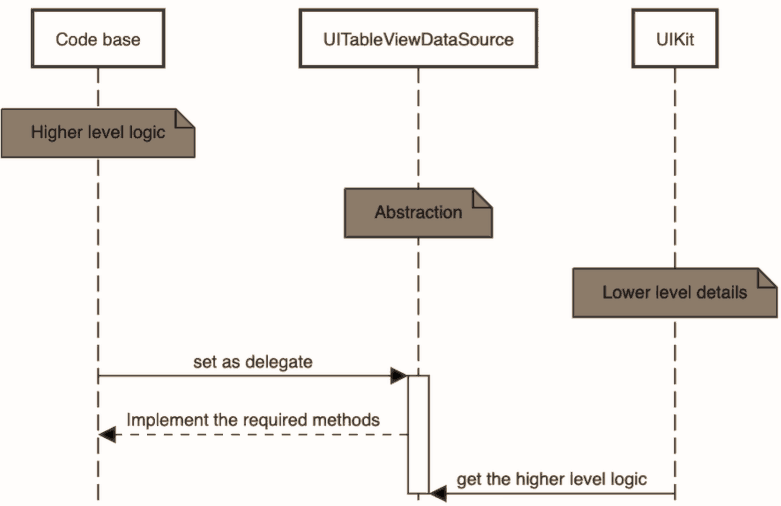
See how the Dependency inversion principle is operational on UITableView. All the implementation details, like rendering or like gesture handling, are kept hidden from the higher level logic. Based on the higher level logic, that we defined on those two methods, the lower level implementation will be laid out. But interestingly they both are dependent on the abstraction or on the protocol. In other words, both the higher level logic and the lower level details are dependent on the abstraction/ protocol. Let us have a diagram of this specific dependency implementation.
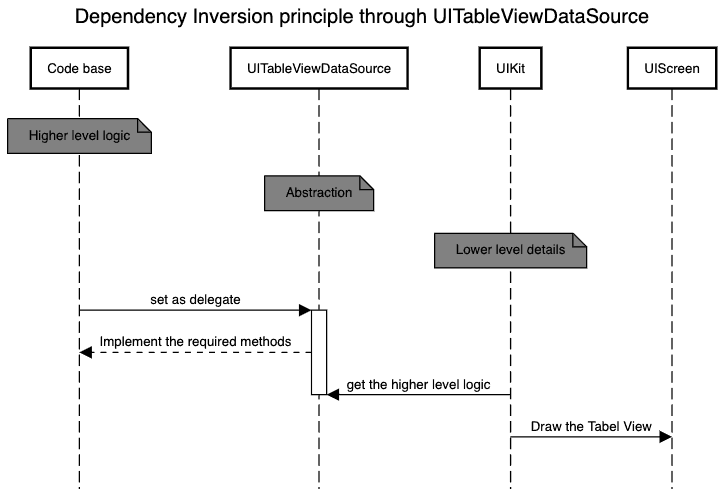
As we can see the the Higher level logic[Code base] has a run time dependency on UIKit but it has no compile time dependency on UIKit. Rather the Higher level logic[Code base] has a compile time dependency over a protocol, UITableViewDataSource.
Now let us have a small talk over the benefit of this type on dependency inversion principle. Let say the latest release of the iOS has some different rendering mechanism than the previous one. Guess what? We do not need to think about it. Even the C++ lib that is doing the render may be thrown away by apple, but we are still good. 🤓
Amazing right.
Now let us build one case study for ourself to implement the Dependency Inversion principle from scratch. 💪
A case study on Dependency Inversion Principle
Let say we are building a profiling module for a game. For the profiling module let us have some use cases:
- We need to profile the different characters with their basic infos and also their capabilities
- Now talk about their capabilities, they will definitely differ among those characters
- Also the basic infos will differ
- Moreover there is the possibility of adding more character on the game on some future time
We want to build our profiling module so that it can handles all the above scenario.
Now let us consider, which part is dependent on which part. Say we will display the Characters profile on ProfileScene. So ProfileScene should have the instances of those characters. But if we do that then ProfileScene has the run and compile time dependency on those Characters. A better approach will be to break that dependency by introducing an abstraction, protocol. Say we named that protocol Profilable. So now if we store the Profilable instances on our ProfileScene rather than the concrete type, then the compile time dependency of ProfileScene is inverted than its run time dependency. Thus giving us the benefit of updating the concrete type or even the ProfileScene. Moreover we can add other character once they confirm the Profilable protocol. Let us have some code now.
Profilable model
Let us define the Profilable protocol.
struct BasicInfo{
    enum Gender: String {
        case Male
        case Female
    }

    let fullName: String
    let gender: Gender
}

enum Species{
    case God
    case Mutated
    case Human
}

protocol Profilable{
    var infos: BasicInfo { get }
    var Species: Species { get }

    func remarks() -> String
}
The BasicInfo and the Species are the helper data structure. By the way if we need any help regarding enum we cal always visit the enum talk for more details.
DC comics character
Let add some DC comic character. These characters are already been added on our inheritance talk. For this talk will extend those types to confirm the Profilable protocol.
extension Batman: Profilable{
    var infos: BasicInfo {
        return BasicInfo(fullName: "\(originalName) aka: \(name)", gender: .Male)
    }

    var Species: Species {
        return .Human
    }

    func remarks() -> String {
        return profile ?? speciality()
    }
}

extension WonderWoman: Profilable{
    var infos: BasicInfo {
        return BasicInfo(fullName: "\(originalName) aka: \(name)", gender: .Female)
    }

    var Species: Species {
        return .God
    }

    func remarks() -> String {
        return "Zeus daughter. \(profile ?? speciality())"
    }
}
Pretty simple right? Now Batman and WonderWoman confirming the Profilable protocol and defining the required var and method.
Marvel Character
Now it is time to add some more characters but this time from Marvel. Again we already added those Avengers on our Protocol, Swift way of thinking talk. Let us extend those Avengers and confirm to Profilable protocol.
extension IronMan: Profilable{
    var infos: BasicInfo {
        return BasicInfo(fullName: "Tony Stark aka: \(name)", gender: .Male)
    }

    var Species: Species {
        return .Human
    }

    func remarks() -> String {
        return "Founding member of Avengers. \(speciality)"
    }
}

extension CaptainAmerica: Profilable{
    var infos: BasicInfo {
        return BasicInfo(fullName: "Steve Rogers aka: \(name)", gender: .Male)
    }

    var Species: Species {
        return .Mutated
    }

    func remarks() -> String {
        return "True born leader. \(speciality)"
    }
}

extension Hulk: Profilable{
    var infos: BasicInfo {
        return BasicInfo(fullName: "Bruce Banner aka: \(name)", gender: .Male)
    }

    var Species: Species {
        return .Mutated
    }

    func remarks() -> String {
        return speciality
    }
}

extension Thor: Profilable{
    var infos: BasicInfo {
        return BasicInfo(fullName: "Thor Odinson aka: \(name)", gender: .Male)
    }

    var Species: Species {
        return .God
    }

    func remarks() -> String {
        return speciality
    }
}
Again nothing fancy. Providing the implementation of Profilable. Now let us add up those characters to make the final ProfileScene.
ProfileScene
On our final code section we will have two separated array of Profilable, one for the JusticeLeague and another for the Avengers. And finally we will return a String containing all those character with some minor formation.
struct ProfileScene{
    let justiceLeague: [Profilable] = [Batman(), WonderWoman()]
    let avengers: [Profilable] = [IronMan(), CaptainAmerica(), Hulk(), Thor()]

    func profileListing() -> String{
        let justiceLeagueProfile =  justiceLeague.reduce(into: "Justice League:\n") { (initial, profilable) in
            initial += "\nFull name: \(profilable.infos.fullName) \nGender: \(profilable.infos.gender) \nRemarks: \(profilable.remarks())\n"
        }

        let avengersProfile =  avengers.reduce(into: "Avengers:\n") { (initial, profilable) in
            initial += "\nFull name: \(profilable.infos.fullName) \nGender: \(profilable.infos.gender) \nRemarks: \(profilable.remarks())\n"
        }

        return justiceLeagueProfile + "\n\n" + avengersProfile
    }
}
Now when we run the profileListing() function, print(ProfileScene().profileListing()), we will get an easy locking profiling of all the characters. Oh for the Higher Order Function, HOF, we can look for the HOF talk. Let us take some insights from the above case study.
Insights of the code study
On the above case study we saw how and when to implement the DIP on Swift through Protocol. Here the different characters are the higher level logic. And the profileListing part being the lower level details. These two higher lever logic and lower level details depend on the abstraction. As a result we were able to add more character later down the road. These abstraction gives us the opportunity to develop two part separately.
How and where to smell for implementing DIP On Swift
- When there is interaction between two separated module. Like Business logic and View.
- The simple code update takes a longer time because of the tightly coupled code.
- A simple change request will impact a lot of code base.
- Two module are integrated with each other in such a way that they cross each other boundary.
- When It is known that one module will have the future changes, then it will be a good idea to access that module through DIP from the initial stage.
But the above statement are nothing but vapor unless we know cons of DIP. So Let us jump on the best practices.
Best practices on Swift for DIP through protocol
- The very first and perhaps the most important suggestion is to know, if the Dependency Inversion is a YAGNI or not? YAGNI stands for
you ain't gonna need it. Overuse of Dependency Inversion will populate the code base with unnecessary abstraction, which will definitely reduce the readability of the code. - Start with a concrete type rather than a
Protocolwhen you are uncertain about the future change request. - Initiate the Dependency Inversion through
Protocolwhen you can see or certainly predict the area of change request. - The default mode should be YAGNI.
- When working with View interaction it is always helpful to work with Dependency Inversion, because View get modified so ofter.
- When working with Business logic, not tiny business logic, it can also be helpful to use the Dependency Inversion. But again remember the YAGNI.
- Any inclusion of third party lib can be introduce to the code through Dependency Inversion, the reason is that third party lib can be thrown away and also we can mock that third party lib on testing time.
Conclusion
Again there is no Silver bullet. The best we can do, is to educate ourself on the different solutions that are available for us on our specific problem. We need to knows the pros and cons for each of them. Dependency Inversion Principle also fall on this category. We have to balance the YAGNI and DIP. I believe this blog post will give you the solid ground to perambulate further more on this topic.
One other topic regularly comes up with Dependency Inversion Principle is Dependency Injection. Oh boy there are some real confusion among them. We just published a blog post on Dependency Injection. Let us have a look.
See you around.
Resources
- Swift Dependency Inversion through Protocol source code
- DIP by Uncle Bob
- Swift compiler and standard library design
- The sequence is drawn on sequencediagram
2 thoughts on “Swift Dependency Inversion through Protocol”